Saturday, August 16, 2014

Home Made Fruit Fly Trap

Atleast once a year we seem to get infested with fruit flies. I hate those pesky little things!  I don't know where they come from but it's usually out of the blue. I had to do something because they were everywhere and started to remind me of the flies in the Amityville Horror movie. 

I should also make it clear that I hate going to the store. Really hate it. The traffic to get there, the people there, and then there's the fact that I have to get dressed and brush my hair. I normally look like one of those poor people you see on an episode of hoarders or in the subway in DC.

So- here's my homemade cheap solution:

Apple cider vinegar. (ACV)
A mason jar (any size will do)
A small piece of plastic wrap big enough to cover the mouth of the jar. 
A toothpick. 

Pour some ACV in the mason jar. You could use any cup really, but I had a mason jar handy. You don't need a lot of ACV, maybe 1/2 to 1 inch in the jar. Anything more would just be a waste. (If you're using a small 4 oz. jelly jar, fill it half way.)

Stretch the plastic wrap over the top of the jar and press it down around the mouth of the jar. Press and seal works great for this step but really any plastic wrap will do. If your wrap won't stay in place you can secure it with a rubber band or even some tape around the mouth of the jar will hold it in place. 

Use a toothpick to make a small hole, but large enough for the fruit flies to crawl in but not so big that they can fly back out easily. 


After a few days you should notice that there are considerably less flies buzzing around your sink or fruit and floating in the ACV instead!  You can place several of them in the kitchen or whereever your fruit flies are hanging out. 


Hopefully this will help you out too, and save you a trip to the store!  

Until next time, check out our Facebook page for more tips and pictures!  


https://facebook.com/LLFarmstafford

Monday, July 28, 2014

Steaming Fresh Eggs

The hardest thing to do with fresh eggs is to peel them after they've been hard boiled.  Fresh eggs taste wonderful and are a beautiful sight but they are next to impossible to peel!  I came across a blog I follow religiously called Fresh-Eggs-Daily by Lisa Steele.  She has been my biggest source of inspiration and has generously offered her advice time and time again when brooding and caring for my ducks and chickens.

This is Lisa's method, and I swear by it as well.  It has never failed and is as easy as can be! Simply steam them!  I had no idea you could steam an egg to hard boil it!  The knowledge I have gained from the networking of other homesteaders and hobby farmers is amazing!  

To steam eggs:

1. Rinse your eggs in warm water (you can use eggs you just collected that morning, if you want) and place them in the top of the steamer.  

2.  Steam for 20 minutes and then plunge the eggs into a bowl of ice water until they are cool enough to peel.

VOILA!  DONE!  How easy is that?!?!  

I encourage you to check out Lisa's blog as well, and see what for delicious recipes and knowledge she has to share!  Thanks for choosing Little Lane Farm!

Until next time...

Saturday, July 26, 2014

Snow much fun!

Snow cones seem to be a sudden interest around my house lately. We used to have an ice shaver that was hardly ever used, and is likely packed in a tote way up in the rafters of the garage. 

Goodwill is my sanctuary of crap-I-don't-need. I love that place. Some of the stuff people give away baffles me. Some of it is junk and some stuff is still in the original packaging. Like the snow cone maker I got the other day. 

I have searched high and low for the bottles of snow cone syrup that was stacked to the ceiling earlier in the season to no avail. Not a single one at Walmart or at Giant, our local grocery store.  

Alright then. I'll make it myself. Somehow. I think. Well, I will try. Basically snow cone syrup is sugar, water and flavoring. I tried 2 cups of sugar to one cup of water but that was way tooo sugary. I could taste the diabetes. So, I reversed it, 1 cup sugar to 2 cups sugar and I was pretty sure that was going to work. 

Now for flavoring. I tried adding drops of candy making extracts and it works but was clear. You can taste the syrup after each drop until you get the desired strength. About 3 drops of extract to the sugar water was good. Adding food coloring to the mix gave it some pizzazz. I mean, who wants a plain colored snow cone??  

I tried adding a small packet of koolaid mix to the sugar water and it was perfect!    Color and flavoring in one and at 20 cents per packet you can't beat the price!  So, I finalized my recipe as follows:
 
-1 Cup WHITE real sugar
-2 Cups water
-Mix water and sugar in a small saucepan and bring to a boil and cool until sugar is completely dissolved. 
-Add 1 SMALL pouch of UNSWEETENED koolaid powder to the sugar water and stir until dissolved. 
-Pour into mason jars to cool completely, and store in the fridge until you are ready to use. 
-Drizzle over shaved ice for a wonderful treat!  
-Recipe makes about 2 cups of syrup. 
*Make several flavors and drizzle over the shaved ice for multi flavor snow cones!


Monday, July 21, 2014

What to do with your FRESH eggs


Okay, you found a place to buy real fresh eggs! Not the "fresh" eggs from the supermarket, FRESH eggs from either a farm, or a Farmers Market. Here's some tips on how to handle the eggs and storing them-
  1. When an egg is going through the egg laying process many wonderful and curious biological adventures begin. Just like in humans a chicken releases an egg the difference is that a chicken releases an egg about once a day. How's that work?
    1. The chicken releases a yolk from her ovary into the oviduct.
    2. The yolk travels down the oviduct and picks up the albumin, or what is commonly called the egg white.
    3. After acquiring the egg white, the yolk continues its magical journey until it picks up the shell membrane that will hold the egg "insides" in place.
    4. After picking up the membrane the egg picks up the shell (which starts out soft!) which is made up of calcite, a crystalline form of calcium carbonate.
    5. After the shell is added the egg is ready to be laid but not before the bloom, a protective coating, is applied as the egg passes from the chicken.

       
  2. After collecting eggs you can store them unwashed on the counter, but if you don't plan on eating them for a few days, it's a good idea to store them in the fridge. It's better to store them rounded side down, pointy side up to retain their moisture.

     
  3. Washing the eggs should be done carefully and only right before you plan to use them, unless they are really soiled. Wash them by gently rubbing them with a damp paper towel. For stubborn spots, gently scrub them with running WARM (NOT COLD) water, using a scotch-brite pad. You should never use any kind of detergent unless specifically made for egg washing like Manna Pros Egg Wipes. After washing the egg, you MUST refrigerate it.

     
  4. It's NOT unusual to find blood or meat spots in an egg. While it's fairly unappetizing to come across, it's perfectly safe to eat the egg. It just means the chicken had a broken blood vessel while the egg was passing through her reproductive tract. IT DOES NOT MEAN THE EGG WAS FERTILIZED! I had always been told that's what it meant, but I can assure you, that is untrue. I have FEMALE chickens, and not a roo for miles around us, and my first few eggs had blood spots.

     
  5. Fresh eggs are beautiful to look at. The albumin is glossy, thick, and clear, and the yolk is beautiful deep yellow. As an egg ages, the white becomes thinner and cloudy. The yolk also fades in color as it ages.


Thanks for buying your eggs from Little Lane Farm! We hope these tips will help you understand the difference between "store fresh" and FARM FRESH as well as the way an egg is made!


Friday, May 30, 2014

Progress

It's hard to write a blog every day or every week when most of the time you're sitting around waiting for stuff to grow, and chickens and ducks to lay eggs!  I mean what do I write?  "Oh, watered plants, sat and waited"? 

However, progress is continually being made!  Every day my plants get a tiny bit bigger and every day that passes is a day closer to fresh eggs as the chickens and ducks are getting bigger!  

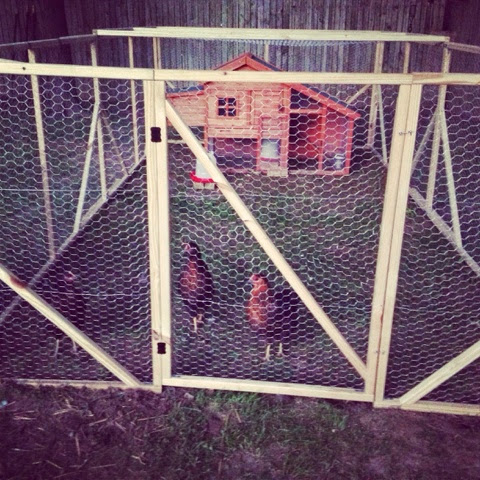
My husband graciously built a run for the chickens that is more solid than my plastic fence held together with zip ties!  

Till next time...

Sunday, May 11, 2014

Everything In It's Place

Friday was a hot one, and for me, a bitey one!  I went to Home Depot, got some stakes and some fencing and built a chicken and duck run. 

It wasn't easy but it wasn't all that hard either. I rather enjoyed the sweat and blood, and dirt!  What didn't make me really thrilled was the stupid Mosquitos out there!  They are crazy bad here where I live!  We've had a fairly wet start to spring so far and the ground is pretty saturated. 

Nonetheless, it's a lot nicer to have the chickens and ducks in an area that allows them to find plenty of shade as the weather gets hotter. Plus they aren't spread out in the yard as bad and not pooping on EVERYTHING in sight!  Ya gotta take the good with the bad, right?  

Till next time...


Friday, May 2, 2014

Urban Homesteading

I am so excited to get things started around here. I have three month old chickens, two month old ducks, and as of May 1, plenty of wonderful herbs in the ground!  So far I planted flat parsley, German thyme, basil, sage, rosemary, lavender, chives, mint, chocolate mint, spearmint, and oregano!  In a few short weeks the chickens will be (hopefully) laying, and some great things are taking shape as far as stocking up on crafted items for sale!  (My favorite style is Americana Prim.) 

My husband is a retired Marine and we have lived on both sides of the US as well as in Chicago but nothing compares to "home". Home for me is Pa. Dutch country. If you've never been to central Pennsylvania, you don't know what you are missing!  The Dutch have the most amazing foods, and are exquisite craftsmen!  My home is decorated with a lot of Amish items and I tend to cook what I know- and that's Pa Dutch as well!

I have so many great things planned for my urban homesteading project and I really hope it all comes together as I imagine it!  Thanks for stopping by my blog and reading my updates!  Till next time...